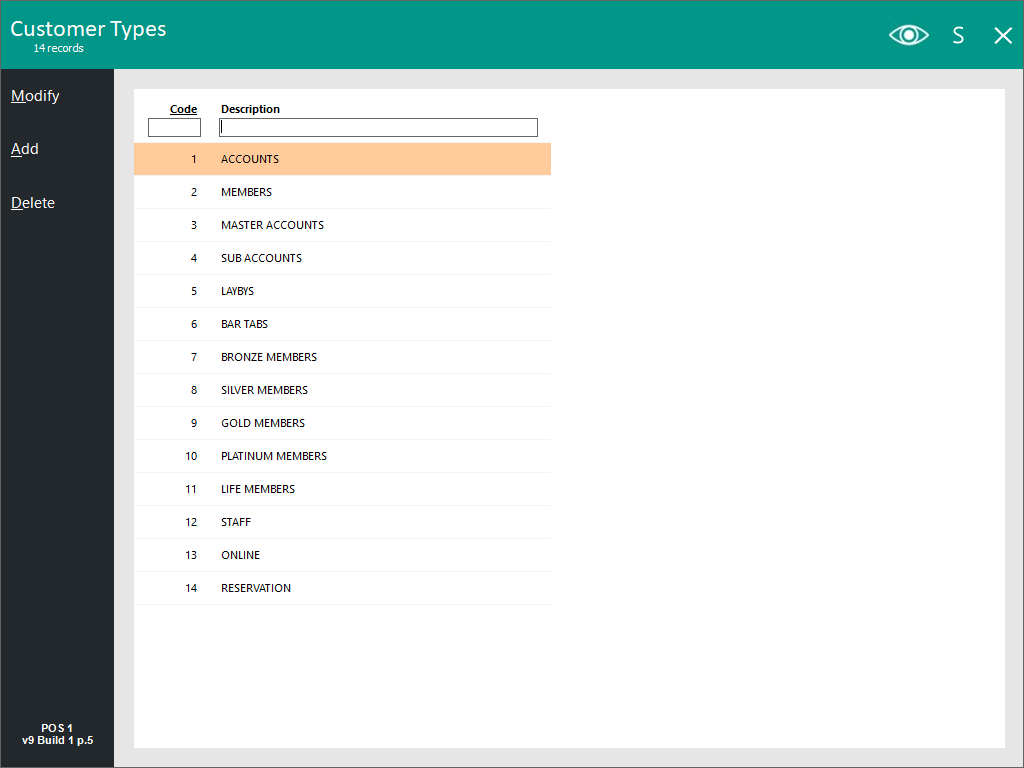
Customer Types are used to group Customers of similar functions together.
Some types can be used for multiple functions, whereas other can only be used for that specific purpose.
At least 1 Customer Type must be created before Customers can be added to the database.
Go to: Back Office > File > Customers > Customer Types.
A new window will open allowing you to Add, Modify or Delete.
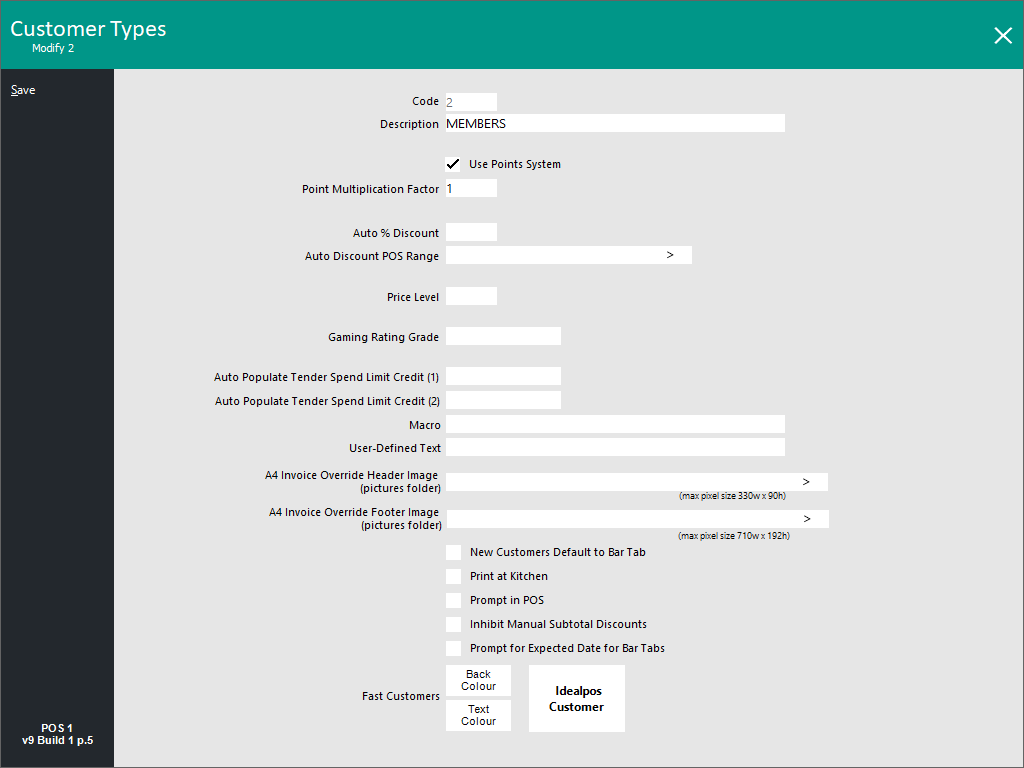
The following options are available when creating or modifying a Customer Type:
Use Points System - Select this box to accrue loyalty points from POS sales to Customers.
Point Multiplication Factor - Specific to this Customer Type up to 4 digits.
Points Limit - A Points Limit can be set for each Customer Type. Once a Customer that's linked to the Customer Type reaches the limit entered in this field, they will stop accruing points. Note that Points Limit can also be set against each individual Customer (the Points Limit can be set for individual Customers by going to Back Office > File > Customers > Customers > Select a Customer > Modify - refer to the Customer Fields page for more info). If a Points Limit is set for both the Customer and the Customer Type, the limit that is configured against the Customer will apply. If a Points Limit is entered that is less than the Customer's currently accrued points balance, the Customer will retain their currently accrued points balance and they will not accrue additional points on future purchases.
Auto % Discount - Will give this Customer Type a % discount on all sales.
Auto Discount POS Range - Range of POS can be selected, E.g. – 1,2,4 or 1-3,5-8 etc.
Gaming Rating Grade - Used to change gaming customer grades.
Price Level - Link a Customer Type to a Price Level. When a Price Level has been set in this field, any Customers linked to this Customer Type will use this Price Level (provided that the individual Customer has their Price Level set to 0; when creating a new Customer, a default Price Level of 0 is used unless a different Price Level was entered in the Customer's record). If the Customer has a custom Price Level set against their Customer record, the Customer's Price Level will override the Price Level set against the Customer Type.
Auto Populate Tender Spend Limit Credit (1,2) - You can auto-populate the Tender Spend Limits located in Global Options based on the Customer Type. This function will ONLY apply to Integrated Gaming and StarrServer customers.
Macro - You can use this field to trigger a macro when any customer from this Customer Type is added to the sale.
User-Defined Text - This option allows additional custom settings for the Customer Type. When Idealpos is configured in either the Canadian or USA regions, an option of [REMOVETAX] can be entered into this field which will make any customer that is linked to the Customer Type exempt from taxes. An option of [BAR TAB DESCRIPTOR=XXXXXXXXX] can be entered and the description entered will be displayed on the POS Screen when adding a Bar Tab Customer linked to this Customer Type to the sale. An example of a descriptor may be [BAR TAB DESCRIPTOR=XMAS CLUB] when used with the Pre-Ordering functionality. Note that the Bar Tab Descriptor is limited to a total of 9 characters due to the maximum character limitation within the User Defined Text field and the limited space available on the POS Screen. To see an example of the Bar Tab Descriptor configured using this function, click here.
A4 Invoice Override Header Image - This field enables an Override Header Image to be configured - the image must be located in the Idealpos Pictures folder (C:\ProgramData\Idealpos Solutions\Idealpos\Pictures\) and can have a maximum resolution of 330 pixels wide by 90 pixels high. When an Invoice for a Customer linked to this Customer Type is produced, the image configured in this field will be displayed on the Header of the Customer's A4 Invoice instead of the Company Logo Graphic that is configured in Global Options > General > Company Logo Graphic. If this field is blank, the Company Logo Graphic configured in Global Options will be displayed on the Customer's A4 Invoice.
A4 Invoice Override Footer Image - This field enables an Override Footer Image to be configured - the image must be located in the Idealpos Pictures folder (C:\ProgramData\Idealpos Solutions\Idealpos\Pictures\) and can have a maximum resolution of 710 pixels wide by 192 pixels high. When an Invoice for a Customer linked to this Customer Type is produced, the image configured in this field will be displayed on the Footer of the Customer's A4 Invoice instead of the Invoice Footer Graphic that is configured in Global Options > General > Invoice Footer Graphic. If this field is blank, the Invoice Footer Graphic configured in Global Options will be displayed on the Customer's A4 Invoice.
New Customers Default to Bar Tab – Select this option to automatically add customers to a bar tab account. It will select the Bar Tab checkbox on their account.
Print at Kitchen - This option allows for the Customer Type to be printed to the kitchen, where the chef may be able to make the call to push those meal requirements through faster to give this level of customers higher service. The Customer Type will be printed at the top of the docket. Click here to see an example of a Kitchen Docket printed with this option enabled.
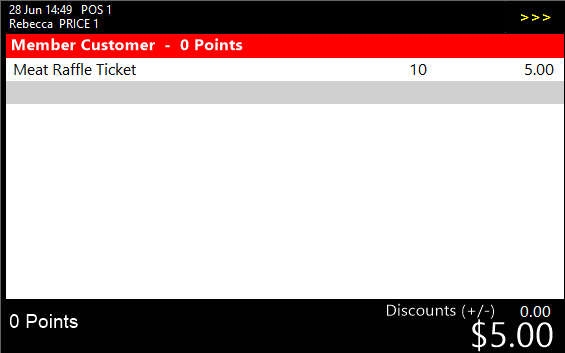
Prompt in POS - When this option is enabled and a Customer that is linked to this Customer Type is added to the sale, Idealpos will display the Customer Type on the POS Screen as a prompt. Click here to see an example of the Customer Type prompt on the POS screen.
Inhibit Manual Subtotal Discounts - When enabled, this option will stop Manual Subtotal Discounts from being applied to the current Customer Type.
Prompt for Expected Date for Bar Tabs - This option will display a Pickup Date calendar selection when saving items to a Bar Tab. This option is only applicable to Bar Tabs. Bar Tabs that are due for Pickup on any particular day will appear in the Pending Sales Report (accessed via Reports > Sales > Pending Sales). The date or date range chosen in the Pending Sales Report will display any Bar Tabs that have a Pickup Date which falls within the selected range, allowing the Clerk or operator to see the orders that are due for pickup within the selected range. Click here to see an example of the Pickup date prompt that will appear when this option is enabled and a Bar Tab is saved.
Fast Customers - All Customer Types can be configured with a unique Button / Text colour that will be represented by the customers that are displayed when Fast Customer Searching has been configured. This allows for customers to be quickly selected by the operator when there are a lot of available customer accounts. Customers displayed will be sorted by Customer Type by default, then by whichever selection (Name, Phone, Company and Code) is made on the screen.
This function is used to trigger a macro whenever a customer linked to this Customer Type is added to the sale.
Go to File > Customers > Customer Types > Add/Modify > Macro > enter the macro that you have created.
You may need to create a keyboard program to use all the features you want.
In our example, every time a customer linked to Members is linked to the sale, 10 raffle tickets will be printed.
If you want to delete a Customer Type, you will need to unlink all Customers from that Customer Type.
You will be presented with a confirmation window.
You also cannot delete Customer Type 1.

If you have Customers still linked to a Customer Type that you are trying to delete, POS will not allow it.

Customer Type 1 cannot be deleted.